To fix an exhaust leak, you should first locate the leak, clean the affected area, and then either patch, seal, or replace the damaged section, ensuring a secure and airtight fit.
Introduction
An exhaust leak, in its simplest definition, is a breach or gap in the vehicle’s exhaust system. From the engine’s combustion chamber to the tailpipe, any escape of exhaust gases before reaching the end can be termed an exhaust leak. This phenomenon not only affects the performance of your vehicle but can also pose safety risks.
What is an exhaust leak?
An exhaust leak refers to unexpected holes or cracks that form in a vehicle’s exhaust system. This system begins at the engine’s combustion chamber and stretches out to the tailpipe. If at any point in this system the exhaust gases escape before reaching the tailpipe, it’s considered a leak. Common reasons for these leaks include corrosion, wear and tear, physical damage, or faulty installation of the exhaust components.
Why is fixing an exhaust leak important?
- Performance and Efficiency: An exhaust leak can significantly reduce a car’s efficiency by as much as 10%. It can interfere with the vehicle’s exhaust flow, leading to a drop in power output and fuel efficiency. Imagine losing 20 horsepower on a 200 horsepower car just because of a small leak.
- Safety: Leaks can lead to harmful gases like carbon monoxide entering the vehicle cabin. Prolonged exposure to these gases can be life-threatening.
- Economic Impact: An untreated exhaust leak can increase fuel consumption by 3 to 4 gallons every 100 miles, leading to an additional fuel cost of $12 to $16, based on an average gas price of $4 per gallon.
- Environmental Concerns: Exhaust leaks can release more unfiltered pollutants into the atmosphere. This includes greenhouse gases, which are detrimental to the environment.
- Vehicle Longevity: Ignoring a leak might cost you more in the long run. Consistent leaks can corrode other parts of the vehicle, decreasing its overall lifespan by 2 to 3 years.
- Sound Pollution: A leaking exhaust often results in a louder vehicle, leading to unnecessary noise pollution.
Addressing exhaust leaks promptly offers numerous benefits, from ensuring the safety of the vehicle’s occupants to upholding environmental standards. Not only does it keep the vehicle in its optimal performance range, but it also avoids unnecessary costs and potential vehicle damage.
Diagnosing the Exhaust Leak
Detecting an exhaust leak early can save you from potential hazards and high repair costs. It’s crucial to recognize the signs, have the right tools, and employ proper inspection techniques. Let’s delve deeper into the specifics.
Symptoms of an exhaust leak
- Loud Noise: One of the most telling signs is a pronounced noise or rumble coming from the exhaust. If you’re hearing a ticking sound, especially during acceleration, it might indicate a leak close to the engine.
- Decreased Power and Efficiency: The vehicle might struggle to accelerate and show a decrease in overall performance. For instance, a car that usually gets 30 MPG might drop to 26 MPG.
- Unpleasant Smell: The distinct odor of exhaust fumes inside the cabin is a direct symptom. These fumes include carbon monoxide, which is odorless but harmful.
- Check Engine Light: Modern vehicles come equipped with sensors that can detect changes in exhaust pressure. An exhaust leak may cause the check engine light to illuminate.
Tools needed for diagnosis
- Mechanic’s Stethoscope: Priced around $20-$50, this tool helps locate the source of the noise and identify potential leaks.
- Smoke Machine: Often used by professionals and priced at $100-$300, a smoke machine can help pinpoint even the smallest leak when the exhaust is filled with smoke.
- Flashlight: A sturdy flashlight, preferably with LED for brighter and clearer illumination (around $10-$30), is essential to visually inspect dark and tight spaces.
- Mirror on a Stick: Useful for viewing hard-to-see areas, this tool costs between $5-$20.
- Rubber Hose: A simple, cheap tool (often under $5) that can be used like a stethoscope to locate the source of the leak.
Inspection methods
- Visual Inspection: Start by looking for obvious signs of damage, such as rust, holes, or cracks. Also, check for broken or loose exhaust mounts and hangers.
- Listening: Place your ear close to the exhaust system (without touching hot parts) or use a mechanic’s stethoscope to identify the exact location of unusual sounds.
- Smoke Test: By filling the exhaust system with smoke, any escaping smoke can highlight the leak’s location.
- Water Test: Pouring a small amount of water over the suspected area can sometimes cause a hissing sound at the leak point.
- Hand Test: With the engine cold, placing a gloved hand near suspected areas can help you feel the air escaping.
Remember, always ensure the vehicle is safely elevated if you need to get underneath it. It’s recommended to use a car lift or proper jack stands, ensuring maximum safety during inspection.
Safety Precautions
While it’s vital to fix an exhaust leak for the sake of vehicle performance and safety, it’s equally crucial to ensure personal safety during the repair process. Let’s explore the necessary equipment and the recommended safety protocols when dealing with vehicle maintenance, especially underneath the car.
Proper equipment and attire
- Safety Glasses: Protect your eyes from dirt, rust, and other particles. Quality safety glasses typically range from $10-$50.
- Mechanic Gloves: These provide a better grip on tools and prevent burns from hot surfaces. A reliable pair can cost between $15-$60.
- Long Sleeves and Pants: Preferably made of durable material, they shield your skin from scrapes and hot components. Depending on the material and brand, you might spend $30-$150 for quality work attire.
- Safety Shoes: These shoes, especially those with steel toes, protect your feet from heavy falling objects. Prices range widely, from $50 for basic safety shoes to $200 for top-tier brands.
- Ear Protection: Especially when working with noisy equipment or if the vehicle is running. Earplugs or earmuffs can range from $5-$30.
- Face Mask: If using chemicals or to avoid inhaling dust and exhaust residue. Basic masks start at a few dollars, while specialized ones can go up to $50.
- Hair and Jewelry: Ensure that long hair is tied back and any dangling jewelry is removed to prevent them from getting caught in machinery or moving parts.
Precautions while working under the vehicle
- Vehicle Elevation: Always use jack stands or a professional car lift when elevating your vehicle. Never rely solely on a hydraulic jack. Jack stands come in different sizes and capacities, ranging from $25-$150 based on their weight capacity and build quality.
- Wheel Chocks: Place these behind tires to prevent the vehicle from rolling. A sturdy pair might cost you between $10-$30.
- Work on a Flat Surface: This reduces the risk of the vehicle shifting or tipping over.
- Never Work Alone: Always have someone nearby in case of emergencies. They can provide quick help or call for assistance if required.
- Ensure Good Ventilation: If the engine needs to run while you’re working, ensure the workspace is well-ventilated to prevent the buildup of harmful fumes.
- Disconnect the Battery: Especially when working on electrical components. This prevents accidental shocks or the engine from starting unintentionally.
- Cool Down: Before starting your repair, allow the car to cool down for at least an hour. The exhaust system, in particular, retains heat and can cause severe burns.
Following these safety precautions can significantly reduce the risk of accidents or injuries. It’s always better to be over-prepared than to face an unforeseen hazard. Remember, your safety is paramount!
Locating the Leak
When an exhaust leak is suspected, accurately locating it is the first and arguably the most crucial step towards rectification. Identifying the precise location can save time, effort, and resources, ensuring that repairs are effective and lasting. There are multiple methods, ranging from simple visual checks to more tactile approaches, to pinpoint the source of the leak.
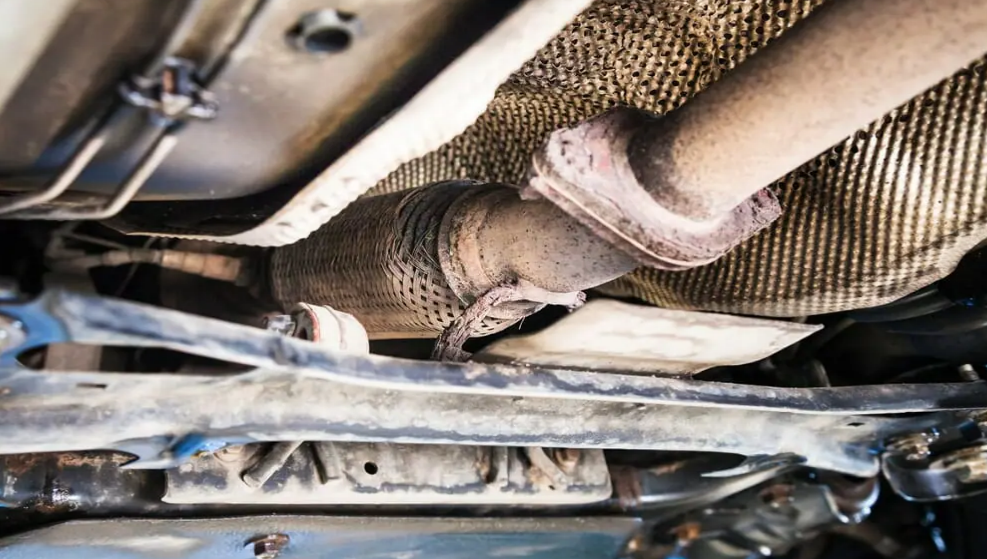
Visual inspection for signs of wear or holes
The easiest and most direct way to identify a potential exhaust leak is through a thorough visual inspection.
- Rust and Corrosion: Over time, exposure to elements can cause parts of the exhaust system, especially welded joints and seams, to rust. Look for brownish discolorations or flaky metal patches. Prolonged corrosion can lead to holes.
- Dark Soot Marks: These indicate that exhaust gases are escaping. These black residue areas are especially prominent around junctions or bends in the exhaust system.
- Physical Damage: Look for obvious signs of dents, bends, or holes. The underbelly of a car is vulnerable to damage from road debris or hitting low ground like speed bumps at a high speed.
Listening for unusual sounds
Sound is often the first indicator of an exhaust leak.
- Ticking or Tapping Noises: These are especially prominent during acceleration and may suggest a leak close to the engine.
- Loud Rumbling: Indicates that the leak is probably towards the back end of the exhaust system, closer to the muffler.
- Hissing or Whistling: These might suggest a crack or a hole in the exhaust pipe. An automotive stethoscope can be particularly useful, allowing for more accurate pinpointing of the sound’s origin.
Feeling for air bursts or hot spots
Using your hand, or preferably a glove, to feel for leaks is an effective tactile method.
- Air Bursts: With the engine running, place your hand close to suspected leak areas. An exhaust leak will produce a distinct pattern of air bursts or pulses.
- Heat Detection: Exhaust gases are hot. If there’s an area where the heat feels more intense compared to surrounding parts, it might indicate a leak.
- Use of Water: Spraying a bit of water on suspected areas can sometimes amplify the sound of the leak, making it easier to detect.
When employing these methods, always remember the previous safety precautions. Ensure the vehicle is safely elevated if necessary, avoid touching extremely hot parts, and always conduct tests in well-ventilated areas. Combining these techniques effectively can swiftly help you locate even the most elusive exhaust leaks.
Materials Needed for Repair
To adequately address an exhaust leak, having the right materials on hand is pivotal. By investing in quality repair materials, you not only guarantee a more robust fix but also ensure the longevity of the repair. Here’s a breakdown of the primary materials you’d require:
Exhaust repair kits
Exhaust repair kits are tailor-made solutions designed to address most exhaust-related problems.
- Patch Kits: They often come with metal patches that can be used to cover holes or cracks in the exhaust. Prices range between $10 to $50, depending on the kit’s contents and brand.
- Putty and Compounds: These are malleable substances that harden after application, effectively sealing leaks. A standard exhaust repair putty might cost you anywhere from $5 to $20.
- Clamps and Wraps: These are used to seal or hold together two sections of an exhaust. They’re especially useful for larger cracks or where parts have separated. Prices vary based on size and material, ranging from $5 to $40.
Sealants and tapes
While tapes and sealants offer a temporary fix, they can be invaluable, especially if you’re stranded or require an immediate solution.
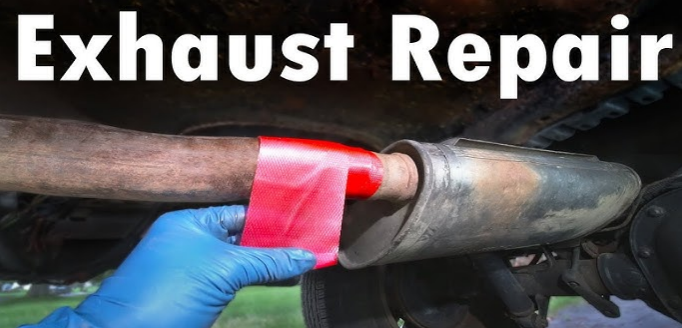
- Exhaust Repair Tape: Designed to withstand high temperatures, it can be wrapped around small cracks or holes. A roll typically costs between $5 and $15.
- High-Temperature Sealant: Often used around joints or to seal minor leaks, these sealants are resistant to the extreme temperatures experienced in exhaust systems. Depending on the brand and quality, a tube can range from $8 to $25.
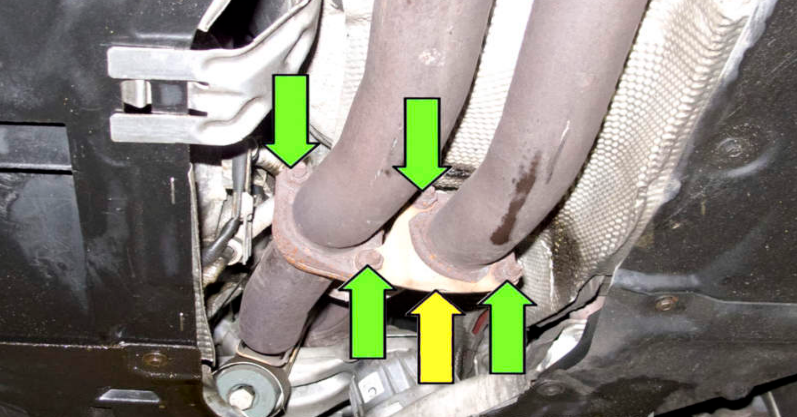
Replacement gaskets and parts
Sometimes, the damage is beyond simple patch-ups. In such cases, replacing faulty components is the best course of action.
- Gaskets: These are used to ensure a tight seal between different sections of the exhaust. Over time, they can deteriorate or burn out, necessitating replacement. Gaskets come in various sizes and specifications. They can range from $3 for basic ones to $50 for high-end or specialized gaskets.
- Pipes and Mufflers: If the damage to a particular section of the exhaust is significant, replacing the entire part might be necessary. A standard muffler costs between $40 to $250, while pipes can vary widely based on length, material, and brand, from $20 to $200.
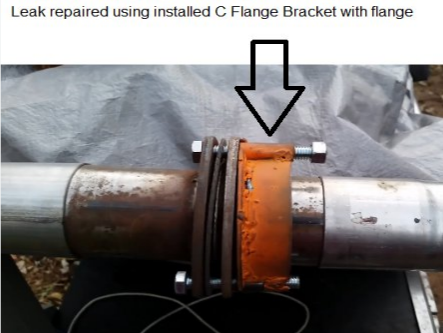
- Flanges and Bolts: These components help in connecting various parts of the exhaust system. If rusted or damaged, they should be replaced to ensure a secure connection. A set might cost between $10 to $50, depending on material and design.
Always refer to the vehicle’s manual or consult professionals when choosing replacement parts. Using the right materials ensures safety, efficiency, and durability of the repair. Remember, a temporary fix might be more affordable in the short run, but a comprehensive repair can save more money and potential hazards in the long run.
Common Exhaust Leak Repair Methods
When it comes to repairing an exhaust leak, multiple methods can be adopted based on the nature and location of the damage. Some methods provide a quick fix, while others offer a more permanent solution. Knowing when and how to employ each method is vital for a successful repair.
Patching small holes
Small holes, often caused by rust or minor impacts, are common culprits of exhaust leaks.
- Metal Patching: Metal patches from repair kits are ideal for these. First, clean the area around the hole. Apply a high-temperature adhesive, then place the metal patch over the hole, pressing firmly. Ensure the patch is larger than the hole for a proper seal. This method can cost between $5 to $30 depending on the size and quality of the patch.
- Exhaust Tape: For a quicker, temporary fix, wrap the exhaust repair tape around the hole, ensuring it covers an area larger than the leak itself. This method costs around $5 to $15 for a roll.
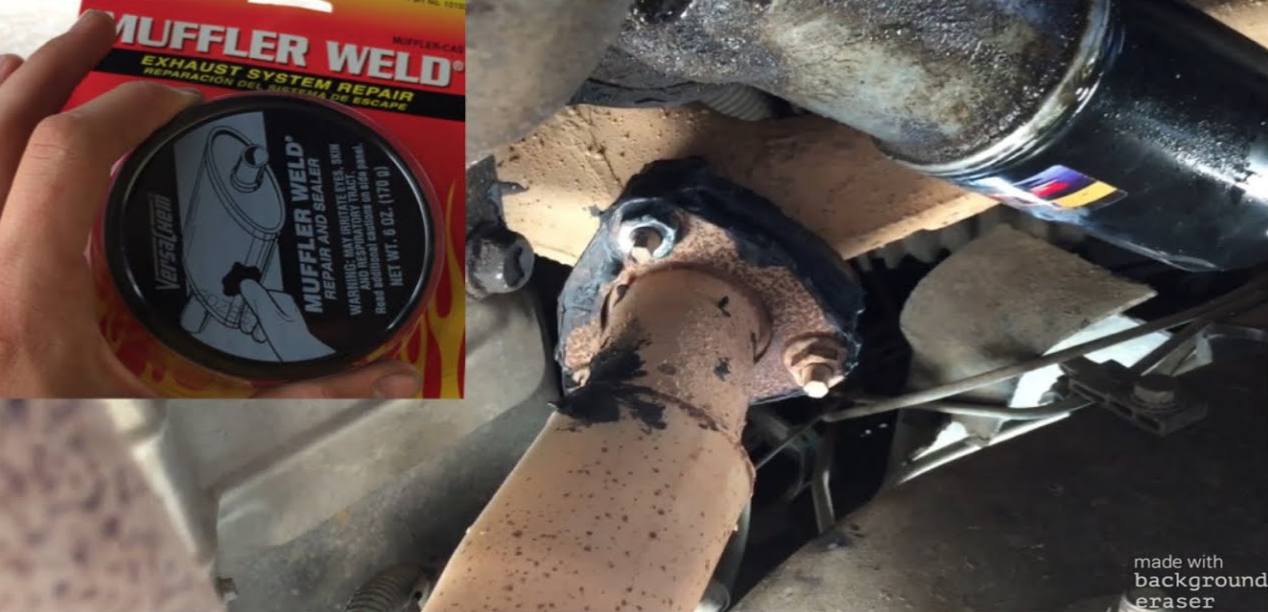
Sealing leaks with exhaust putty
Putty provides a semi-permanent solution and is best for sealing small cracks or leaks at joints.
- Application: Clean the area thoroughly to ensure optimal adhesion. Knead the putty to activate the chemicals, apply it over the leak, and press firmly. Allow it to cure as per the manufacturer’s instructions. High-quality putty can last for several years and costs between $5 to $20.
- Effectiveness: While putty can seal minor leaks effectively, it’s not recommended for larger cracks or where there’s significant damage.
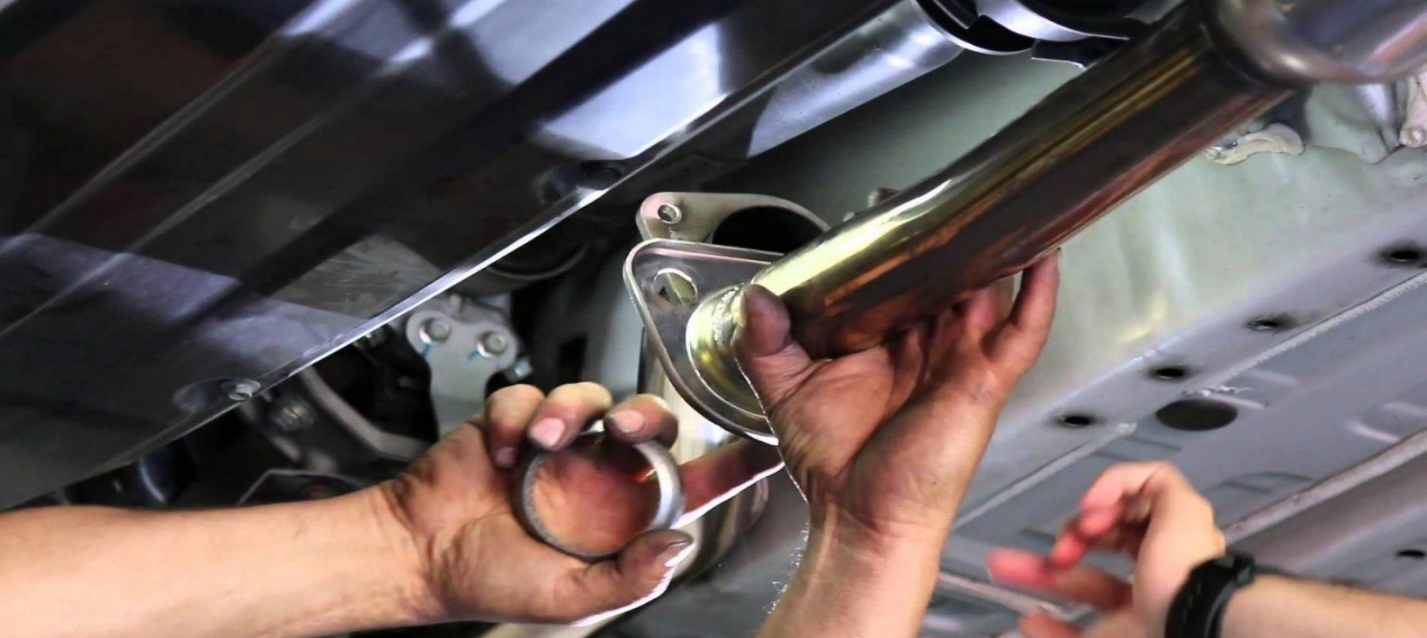
Replacing damaged sections
When damage is extensive, the best approach is often replacement.
- Pipes and Mufflers: These are common components that might require replacement. Always choose parts compatible with your vehicle’s make and model. Depending on the part’s material, quality, and brand, it can range from $20 to $250.
- Gaskets: If a leak originates from a junction or connection point, it might be due to a worn-out gasket. Replace it with a new one compatible with your vehicle. Gasket prices vary, costing between $3 and $50.
Tightening or replacing loose clamps and mounts
Loose connections can often be the source of leaks.
- Tightening: Sometimes, the problem is merely a loose bolt or clamp. Using a wrench or ratchet set, tighten these components. Ensure not to over-tighten as it can lead to additional damage.
- Replacement: Corroded or damaged clamps and mounts should be replaced to maintain the exhaust’s structural integrity. Quality clamps and mounts can cost between $10 to $50.
In conclusion, while some repairs can be undertaken by car owners, others might require professional expertise. Always weigh the cost of repairs against the potential risks. Sometimes, investing in a slightly more expensive but permanent solution offers better value in terms of safety, performance, and peace of mind.
Step-by-Step Repair Guide
Fixing an exhaust leak can significantly boost vehicle performance and safety. Here’s a comprehensive guide to assist you through each step of the process, ensuring a robust and efficient repair.
Preparing the area for repair
- Safety First: Wear safety goggles, gloves, and protective clothing. The exhaust system can be extremely hot, especially if the vehicle has recently been running. Always wait for it to cool down before starting any repairs.
- Elevate the Vehicle: Using a car jack or ramps, lift the vehicle to access the exhaust system. Ensure the vehicle is stable before working underneath it.
- Clean the Damaged Area: Using a wire brush, scrub away rust, dirt, and other debris from the leak area. A clean surface ensures better adhesion and more effective repair. An effective cleaning solution might set you back around $5 to $15.
- Identify the Damage: Utilizing the visual and auditory methods previously discussed, pinpoint the exact location of the leak. Remember, there could be multiple leaks, so inspect thoroughly.
Applying the chosen repair method
- Choose the Appropriate Method: Based on the damage’s nature and extent, decide if you’ll be patching, using putty, replacing components, or simply tightening connections.
- Patch, Putty or Replace:
- For small holes, cut a piece from an exhaust repair kit that sufficiently covers the hole and attach it following the kit’s instructions. Kits can range from $10 to $50.
- For cracks or joint leaks, knead the exhaust putty until mixed well, and apply it generously over the damage. Let it cure for the duration specified on the product. Putty costs can vary from $5 to $20.
- If the damage is too severe, replacing the damaged section or component may be the best approach. The cost of replacement parts can vary widely based on your vehicle’s make and model.
- Secure the Exhaust: If the issue was a loose connection, tighten or replace clamps, bolts, or mounts. Ensure everything is secure but be cautious not to over-tighten and cause new damage.
Testing the repair
- Visual Inspection: Before starting the vehicle, visually inspect your work to ensure everything seems sealed and in place.
- Listen for Leaks: Start the vehicle and listen closely to the exhaust. The previous hissing or ticking sound associated with a leak should no longer be present.
- Feel for Air Bursts: With gloves on, pass your hand around the repaired area. You shouldn’t feel any air bursts indicative of a leak.
- Monitor Performance: Over the next few days, pay attention to your vehicle’s performance. Any reduction in noise levels, improvement in fuel efficiency, or better overall driving experience indicates a successful repair.
Remember, if you’re unsure about any step or feel the repair isn’t holding, consult a professional mechanic. While DIY repairs can save time and money, ensuring safety and the vehicle’s longevity should always be the top priority.
Post-Repair Tips
After you’ve successfully repaired the exhaust leak, the next important step is ensuring the longevity of your repair and the overall health of the exhaust system. These post-repair tips aim to keep your exhaust system functioning efficiently while preventing future issues.
Proper maintenance to prevent future leaks
- Regular Inspection: Every 3 months or 3,000 miles, whichever comes first, visually and audibly inspect your exhaust system. Check for rust, holes, or any loose parts that can lead to leaks in the future.
- Avoid Harsh Conditions: Salt, used in many places to melt snow, can speed up the corrosion process of exhaust systems. If you live in an area where roads get salted, consider washing the undercarriage of your vehicle periodically.
- Drive with Care: Avoiding deep potholes or overly rough terrains can prevent damage to the exhaust system. Such damages can lead to leaks if not addressed promptly.
- Upgrade Materials: If you live in particularly harsh environments, consider upgrading to stainless steel exhaust components. They tend to resist rust better than traditional materials.
- Exhaust System Cleaners: Use cleaners and conditioners, which cost around $10 to $30, designed to remove carbon deposits from the exhaust system. This can help maintain its efficiency and extend its lifespan.
When to consider replacing the entire exhaust system
- Age of the System: An exhaust system that’s been on the road for over 10 years or more than 150,000 miles may be reaching the end of its life. At this point, minor repairs might just be a temporary fix.
- Multiple Leaks: If there are multiple leaks across different parts of the exhaust, it might be more cost-effective to replace the whole system rather than patching each leak.
- Reduced Fuel Efficiency: If you’ve noticed a significant decrease in your vehicle’s miles per gallon (MPG) and you’ve ruled out other potential causes, it might be time to consider a new exhaust system.
- Consistent Noise Issues: Persistent noise, even after repairs, can be a sign of larger, underlying issues within the exhaust system.
- Cost Factor: Sometimes, the cumulative cost of frequent minor repairs can approach or even exceed the cost of a brand new exhaust system, which can range from $200 to $1,000, depending on the vehicle’s make and model.
- Improved Performance: Modern exhaust systems are designed to be more efficient, leading to better fuel efficiency and overall vehicle performance.
Remember, a well-maintained exhaust system not only ensures optimal vehicle performance but also safeguards the environment by reducing harmful emissions. Always weigh the costs and benefits when deciding between frequent repairs and a complete replacement.
Potential Challenges and Troubleshooting
Repairing an exhaust leak is not always straightforward. Various challenges may arise during the repair process. Here, we delve into some of these challenges and offer solutions to ensure a successful repair.
Addressing difficult-to-reach areas
- Use of Specialized Tools: Invest in flexible wrenches or ratchets. These tools, priced around $20 to $60 depending on the brand and quality, allow for easier access to tight spaces and can save considerable time.
- Elevate Your Vehicle: Using a hydraulic jack or car ramps, which can cost anywhere from $30 to $150, safely elevate your vehicle. This gives you more room to work and a better angle to address those hard-to-reach spots.
- Seek Assistance: Sometimes, having an extra pair of hands can help. One person can hold the flashlight, while the other works, ensuring clear visibility in tight spaces.
Ensuring airtight seals
- Thorough Cleaning: Before applying any sealant, ensure the area is clean and free of rust or debris. This ensures better adhesion and a more effective seal.
- High-Quality Sealants: Opt for heat-resistant exhaust sealants. These are specifically designed for exhaust repairs and can handle the high temperatures. Prices range from $5 to $20 depending on the brand and quantity.
- Layering Technique: Apply the sealant in layers, allowing each layer to dry before adding the next. This can help in achieving a more robust and airtight seal.
- Check for Alignment: Ensure that the parts you’re joining are aligned correctly. Misaligned parts can create gaps that are hard to seal effectively.
What to do if the leak persists
- Re-inspect: Go back and check your work. Sometimes the leak may be coming from a neighboring area you might have missed initially.
- Pressure Test: Consider doing a pressure test. This can help pinpoint the exact location of the leak. Some automotive shops offer this service, typically charging between $50 to $150, based on the complexity and the vehicle model.
- Seek Expert Help: If you’ve tried multiple repairs and the leak still persists, it might be time to consult with a professional mechanic. They might identify issues that are not apparent to the untrained eye.
- Consider Replacement: Sometimes, the damage might be too extensive for a patch-up job. If the repair costs, time, and efforts are mounting, it might be more efficient, both in terms of time and money, to replace the damaged section or even the entire exhaust system.
Dealing with exhaust leaks can be challenging, but understanding the potential pitfalls and being equipped with troubleshooting techniques can make the process smoother and more effective.
